AdSense Space
(Left)
(Left)
AdSense Space
(Right)
(Right)
Index
1. What this is2. The main window3. Profiles4. Mapping a button5. Layouts6. Radial menus7. Virtual Keyboard8. Console Desktop9. File Explorer10. Appearance & themes11. Controller reference12. TroubleshootingPersonalConsole — User Guide
How to use PersonalConsole, screen by screen.
This guide answers "what is this screen for, and how do I do X". It does not repeat what is already written elsewhere:
- Installing it, what it needs, where your files are kept, known limitations →
RELEASE-README.md - What changed in a version →
PersonalConsole/docs/RELEASE-NOTES.md - Why it needs administrator, and why you can trust the build →
SECURITY.md
Everything below describes the product as it is now — there are no version numbers here on purpose. If something does not match what you see, the guide is wrong and should be fixed.
Screens referenced as
main/profiles.png live in PersonalConsole/screenshots/ui/.1. What this is
PersonalConsole turns a Windows PC into something you can drive from the couch with a game controller. It does three things:
- Translates your controller into keyboard and mouse input, per application, so a program that never supported a pad can still be driven by one.
- Replaces the Windows desktop with a full-screen, controller-friendly one.
- Gives you a Virtual Keyboard, radial menus and a file browser you can use without a mouse.
2. The main window
The left sidebar is the whole app. Five sections:
| Section | What it is for |
|---|---|
| Profiles & Templates | Which controller setup applies to which program |
| Controller Mapping | What each button does |
| Virtual Keyboard | The Virtual Keyboard's look, languages, dictionaries and saved sign-ins |
| Console Mode | The full-screen desktop, its tabs, and the built-in file browser |
| Preferences | Startup, controller detection, appearance, themes, updates |
At the bottom: Minimize and Exit.
Minimize puts the window away and leaves the app running — the controller keeps working. Where it goes depends on one setting:
| System Tray Behavior (Preferences → System) | What Minimize does |
|---|---|
| Off (default) | An ordinary minimised window on the taskbar |
| On | The window is hidden entirely and only the tray icon is left |
Either way the tray icon brings it back.
Getting around with the controller:
LB / RB change section, LT / RT change the tab inside a section. The hints are printed at the bottom-left and change with the screen. Mouse and keyboard work everywhere too.3. Profiles
A profile is a full set of button mappings plus the program it belongs to. PersonalConsole switches profiles by itself: when a program you have a profile for comes to the foreground, its mappings take over. If a program has no profile, the Desktop profile applies.
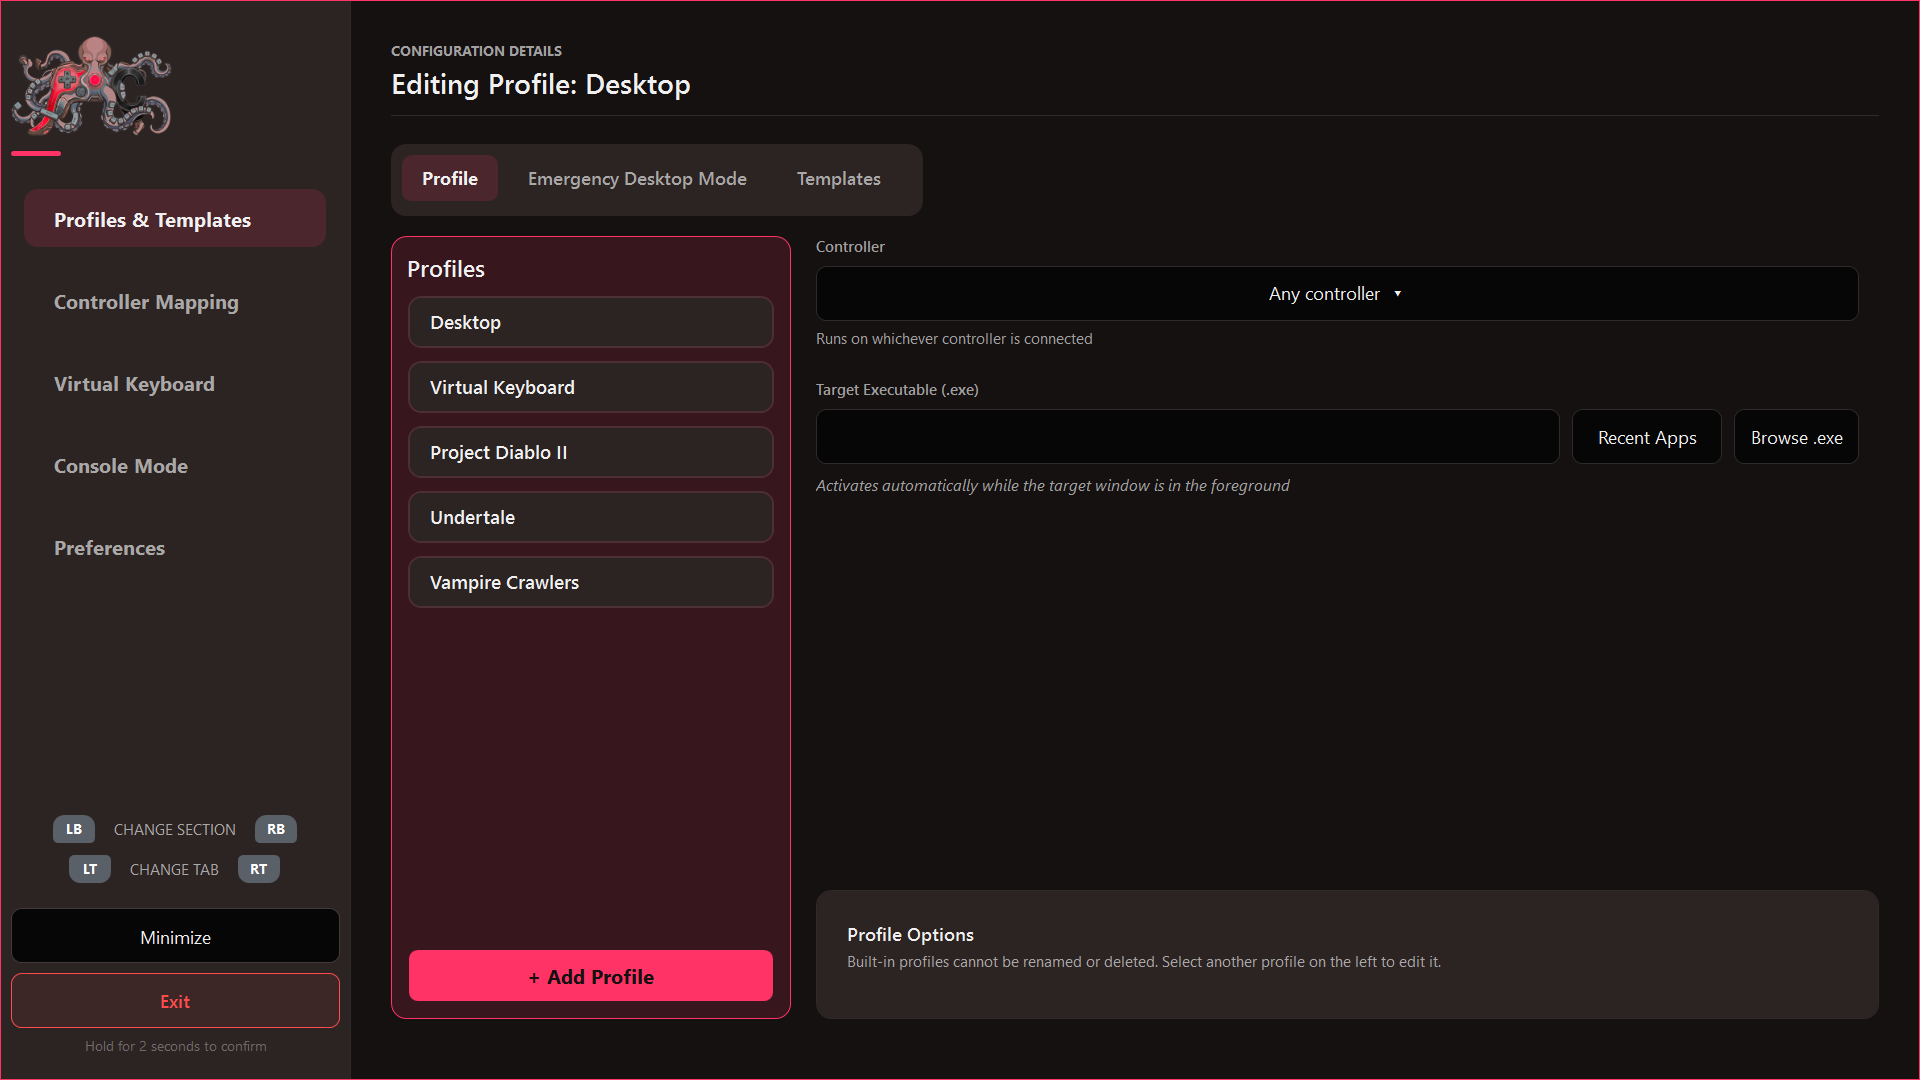
The two built-in profiles
Two profiles always exist and are pinned to the top of the list. They are not examples you can replace — the app relies on them, which is why neither can be renamed or deleted.
Desktop
The fallback. It applies whenever nothing more specific does — you are on the Windows desktop, or in a program that has no profile of its own. This is the profile to set up first, because it is the one you will spend most of your time in: it is where you want the sticks driving the mouse, a button opening the Virtual Keyboard, and so on.
It is also the profile the app forces in three situations:
- Emergency Desktop Mode — the combination from that tab drops you back here from anywhere, which is the whole point of it (section 3, Emergency Desktop Mode).
- While a file picker or other system dialog opened by PersonalConsole is on screen — that dialog belongs to the app rather than to your game, so no game profile could sensibly apply. Desktop keeps the pad driving the mouse and buttons inside it.
- When a program's name cannot be read — an elevated process, for example. Rather than guess, the app falls back here and notes it in the log.
Virtual Keyboard
Active whenever a Virtual Keyboard is open, whatever is in the foreground. It outranks every other profile, including the one for the game you are playing.
That is deliberate: while you are typing, the pad has to drive the keyboard, not the game underneath. Without it, the same stick would move a cursor and a character at once. The profile is what makes the keys, the prediction row and the close button reachable.
Map here anything you want available while typing — closing the keyboard, switching language, moving the caret. Bindings you put in a game's own profile are not in effect during that time.
📌 So the order of precedence is: Virtual Keyboard open → its profile · a system dialog or the emergency combo → Desktop · otherwise → the profile matching the foreground program · nothing matches → Desktop.
Creating one
- Open Profiles & Templates → Profile.
- Press + Add Profile under the list.
- Set Target Executable (.exe) — Browse .exe to pick the program, or Recent Apps to choose one you have used recently.
- Optionally set Controller if the profile should only apply to one specific pad. The default, Any controller, applies to whichever pad is connected.
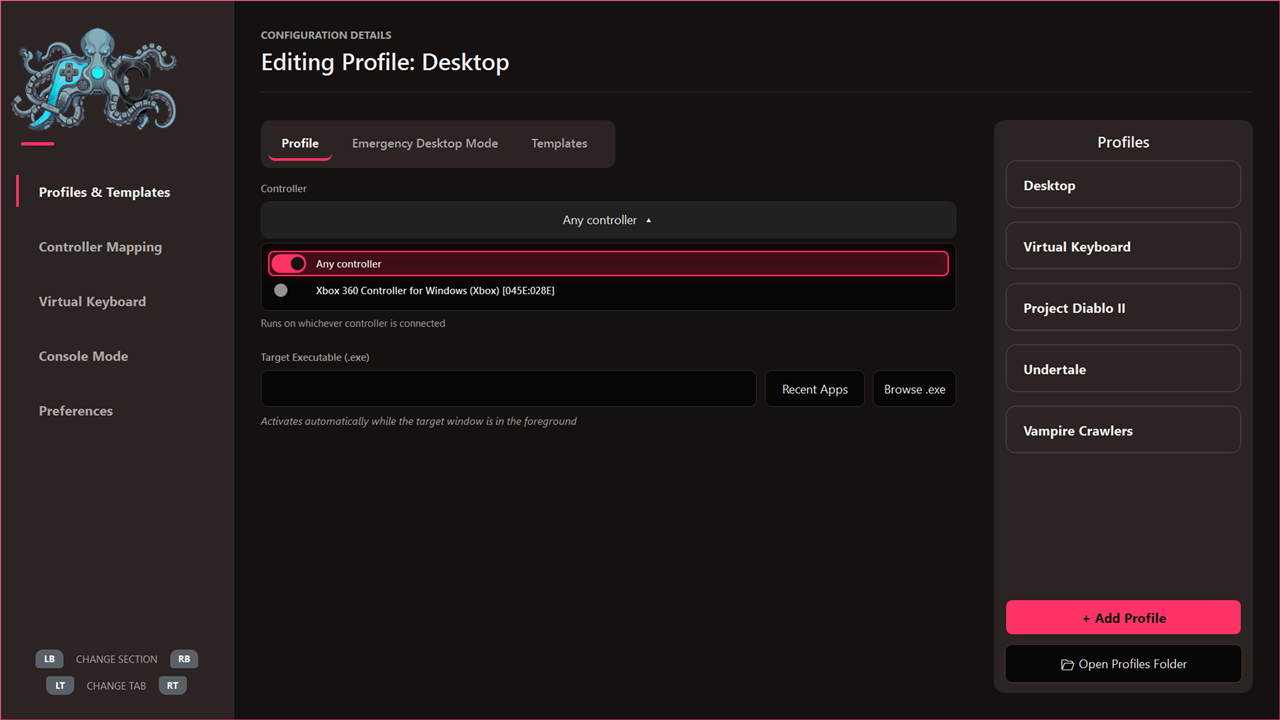
The line under the box — "Activates automatically while the target window is in the foreground" — is the whole rule.
Editing and deleting
Click a profile's card again while it is already selected: a small Profile Options panel appears over the list with Edit Profile. 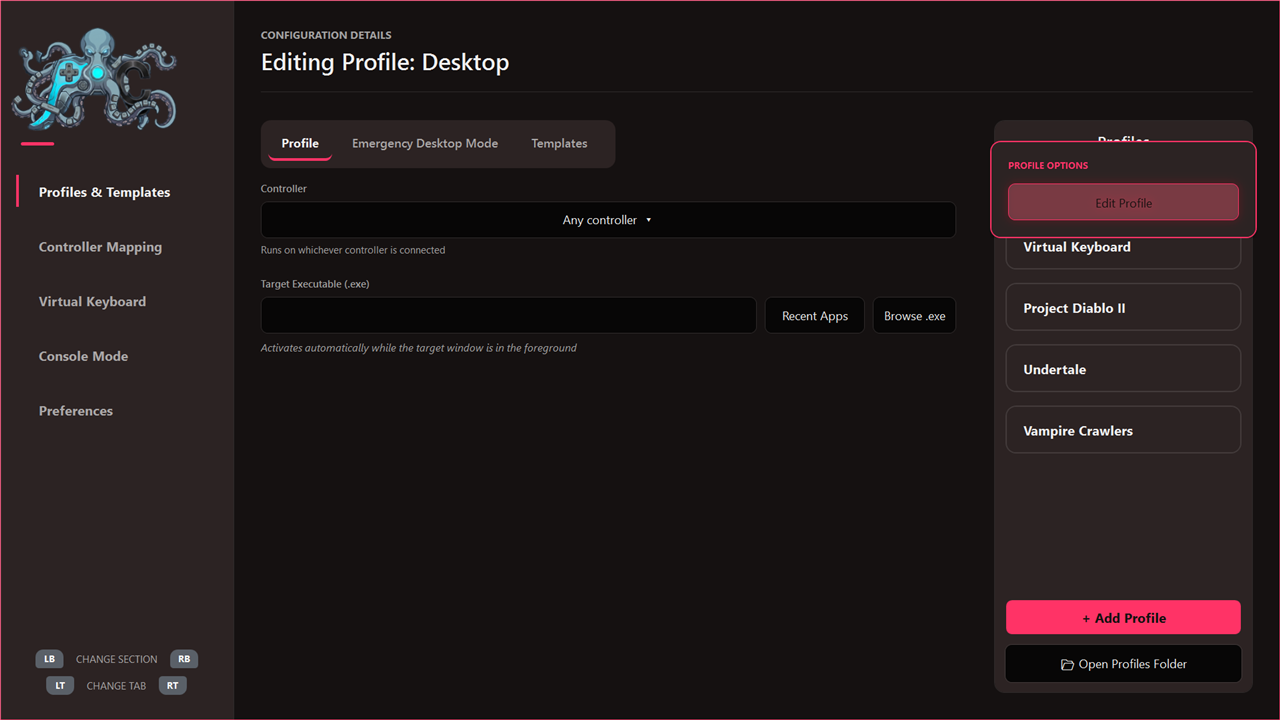
⚠️ Built-in profiles (Desktop, Virtual Keyboard) cannot be renamed or deleted. The panel says so.
⚠️ Deleting a profile is permanent, and it is a hold button — keep it pressed until the bar fills. Letting go early cancels, which is the point.
Emergency Desktop Mode
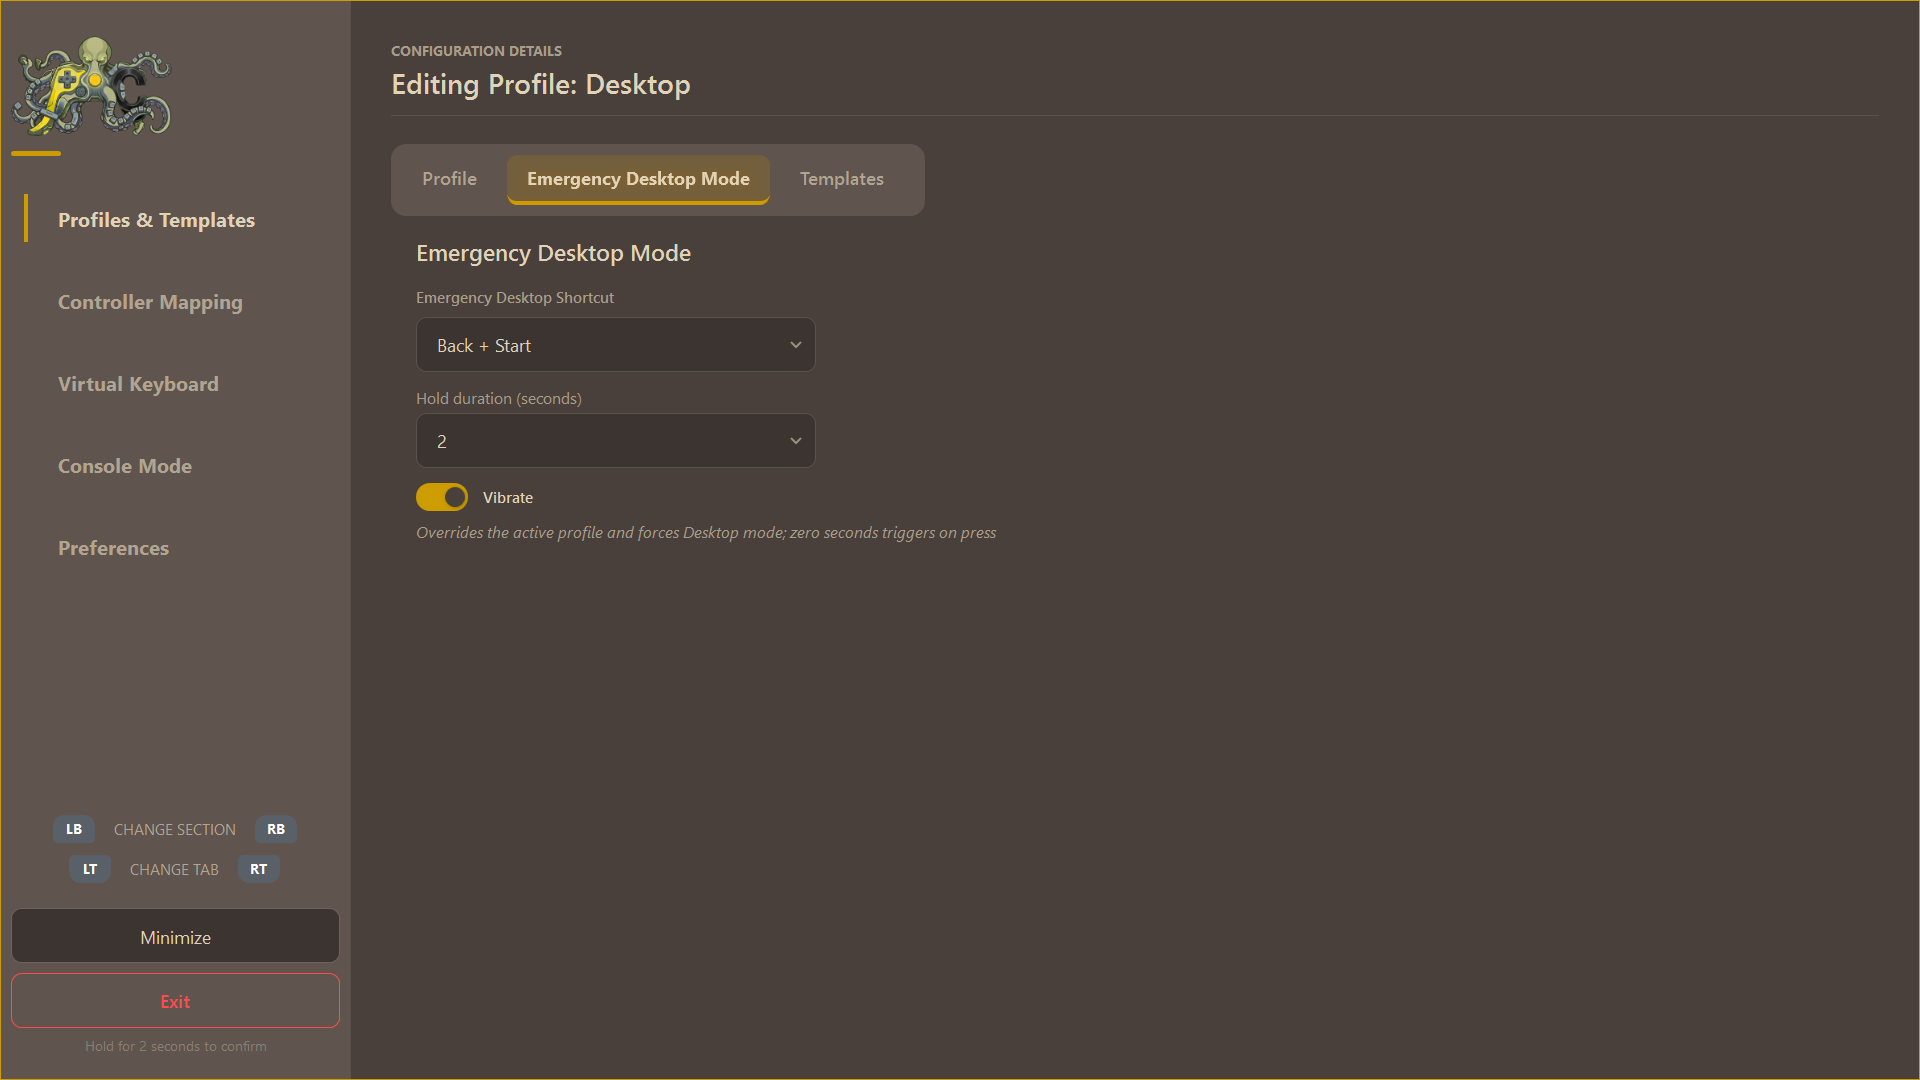
If a game's mapping ever leaves you stuck, this combination force-switches back to the Desktop profile system-wide. Two dropdowns: the combination itself and how long it must be held. Set them to something no game will use by accident.
Templates
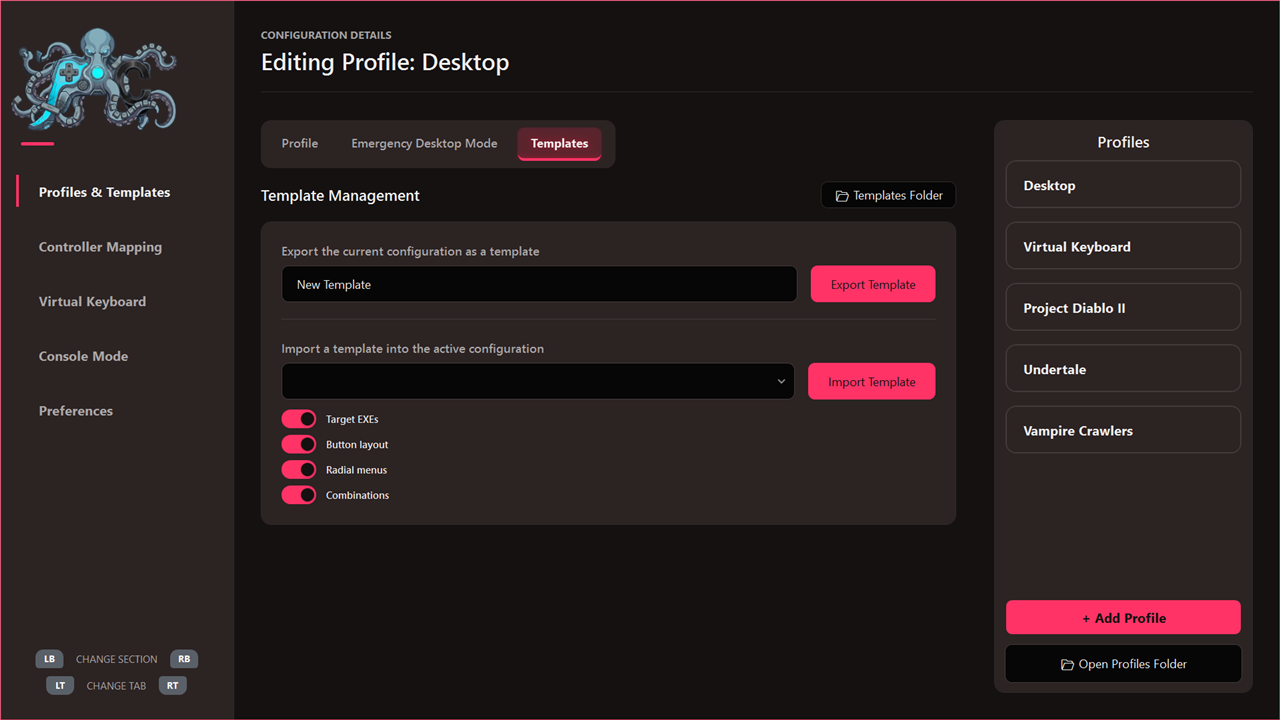
Export Template writes your mappings to a file; Import Template loads one. Four toggles pick what a template carries, so you can move only the parts you want to another PC.
4. Mapping a button
Open Controller Mapping. The tab strip selects which part of the pad you are working on: Device Layout, Actions, Menu, D-Pad, Bumpers & Triggers, Left Stick, Right Stick, Combos.
Device Layout is a picture of your controller with every binding drawn next to the button it belongs to — the fastest way to see what is already assigned. Assigned buttons stay highlighted. 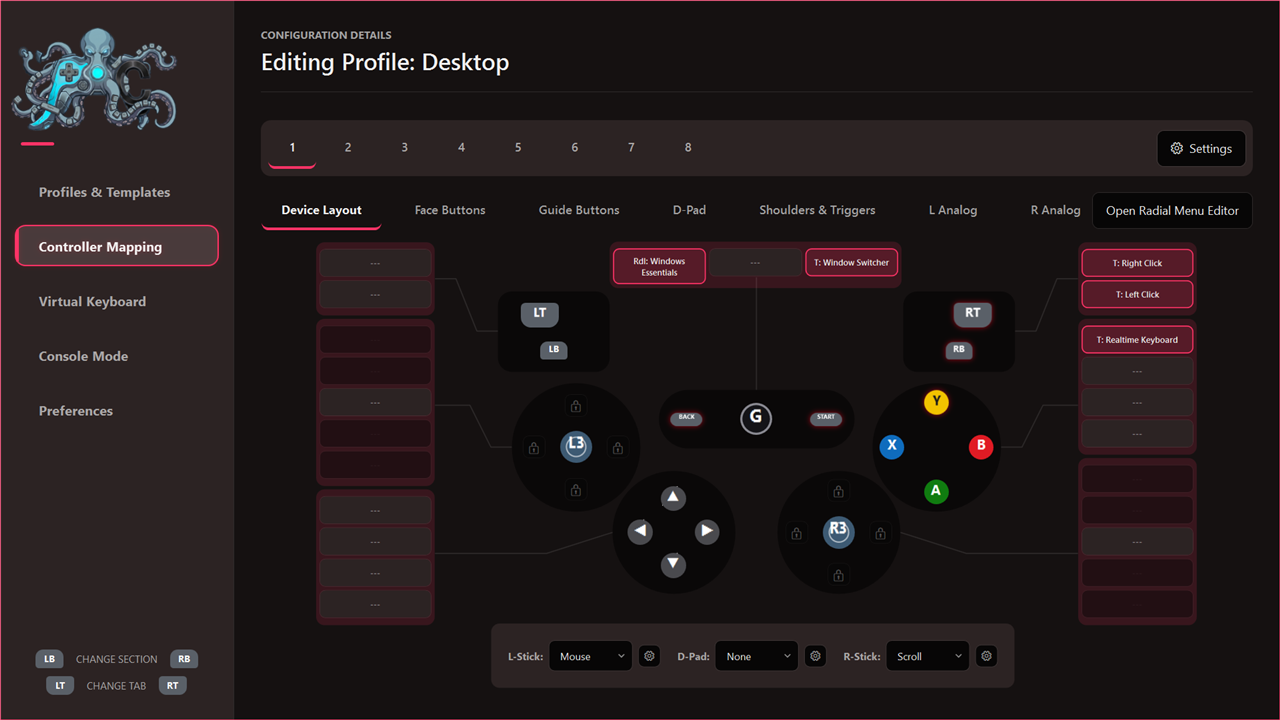
The steps
- Select the button — on Device Layout, or from one of the other tabs.
- The editor opens full screen. Its top-left corner names exactly what you are editing: the button's own glyph, the profile, and the layout.
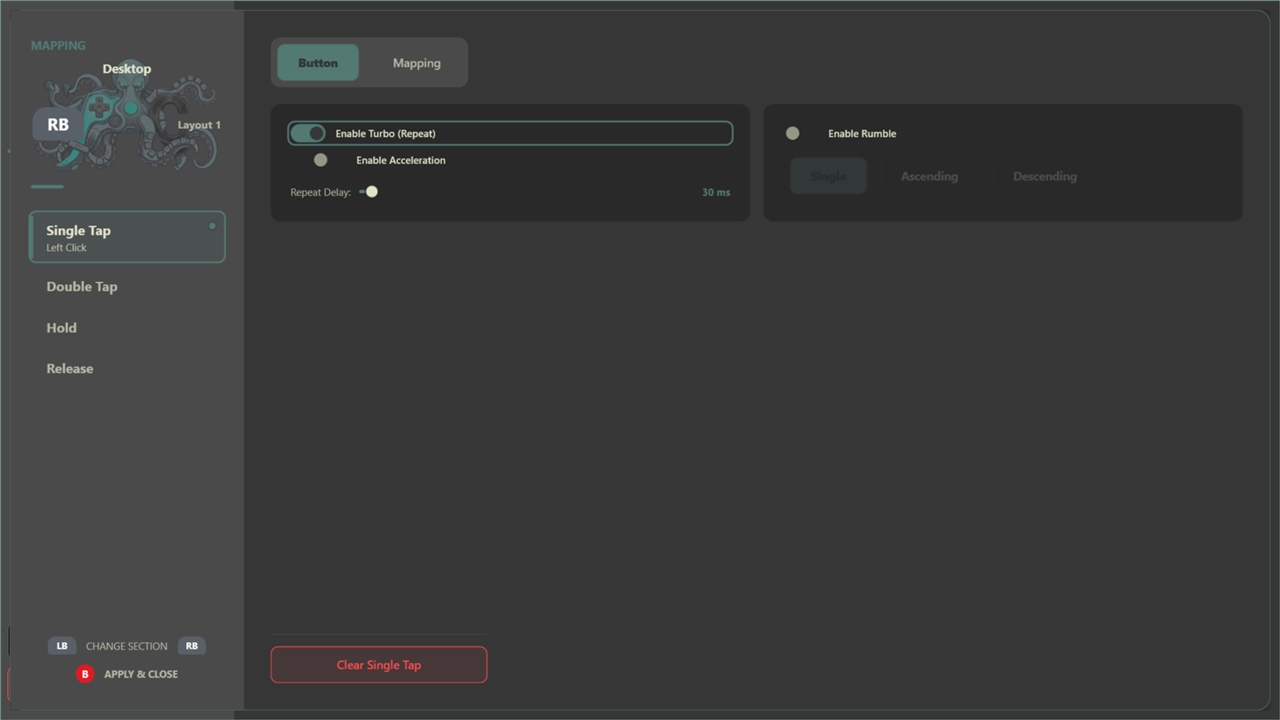
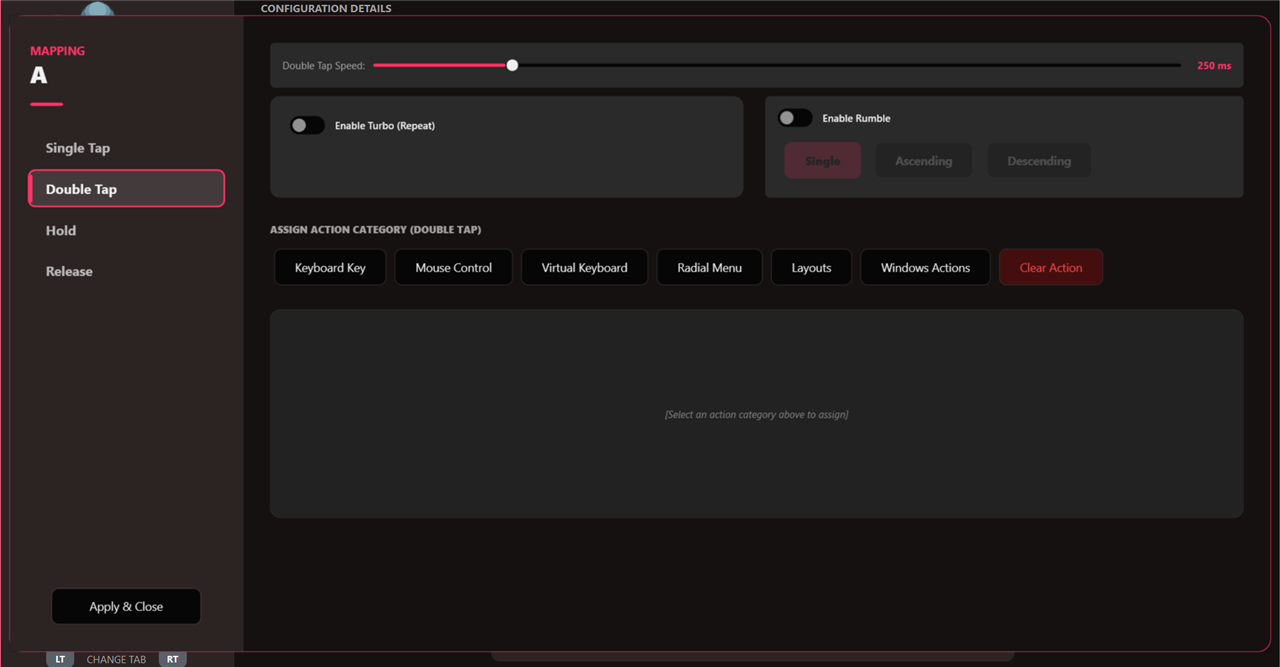
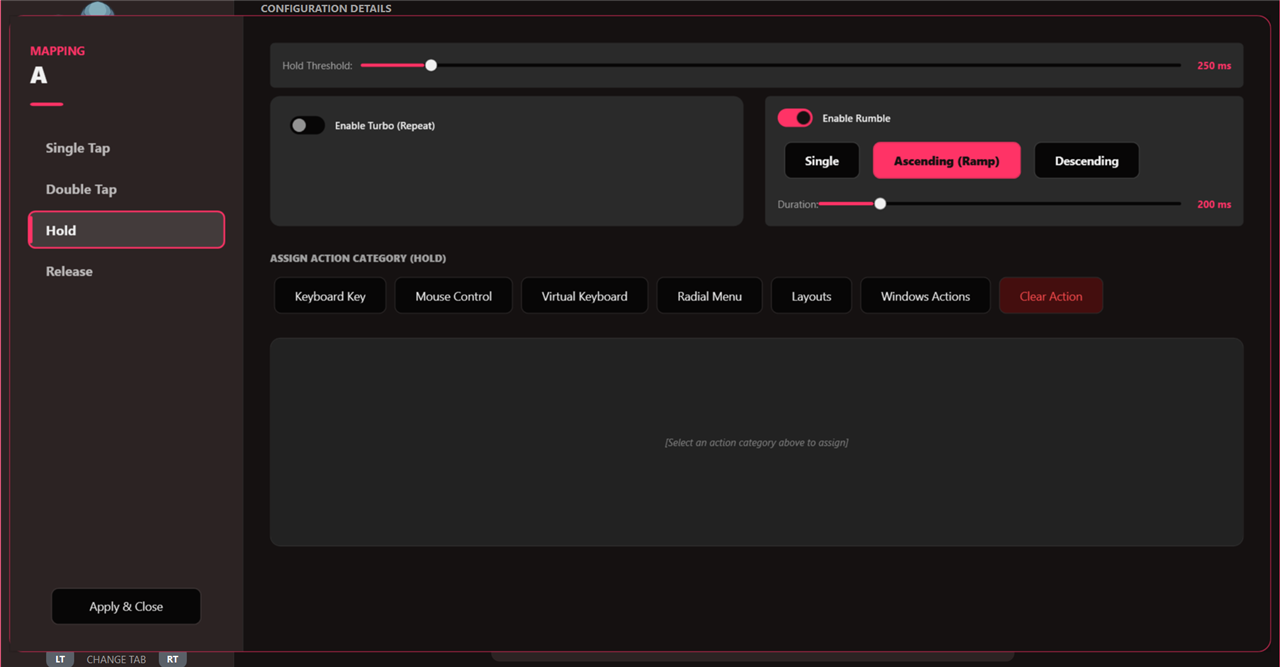
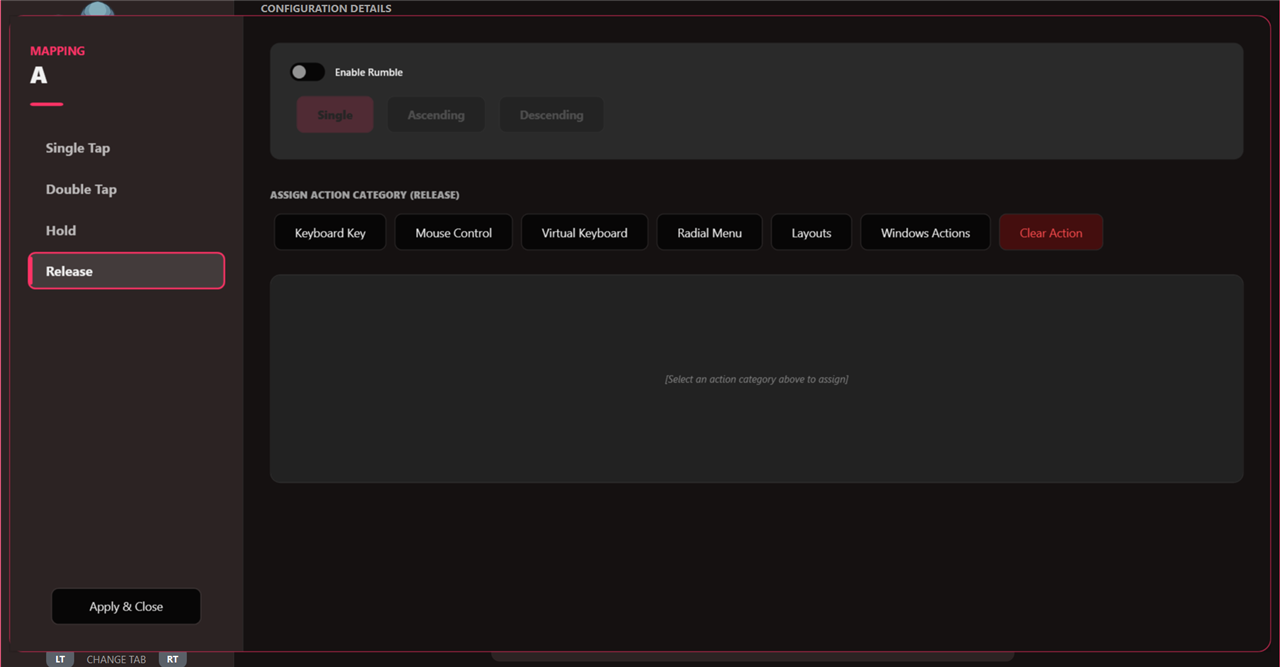
- Pick the slot on the left — Single Tap, Double Tap, Hold, Release. One button can carry a different action in each of the four.
- Pick a category, then the action inside it.
- Press B (Apply & Close), or
Esc.
The categories
| Category | What you get | Screen |
|---|---|---|
| Keyboard Key | A full QWERTY picker, plus Win / Alt modifier keys | 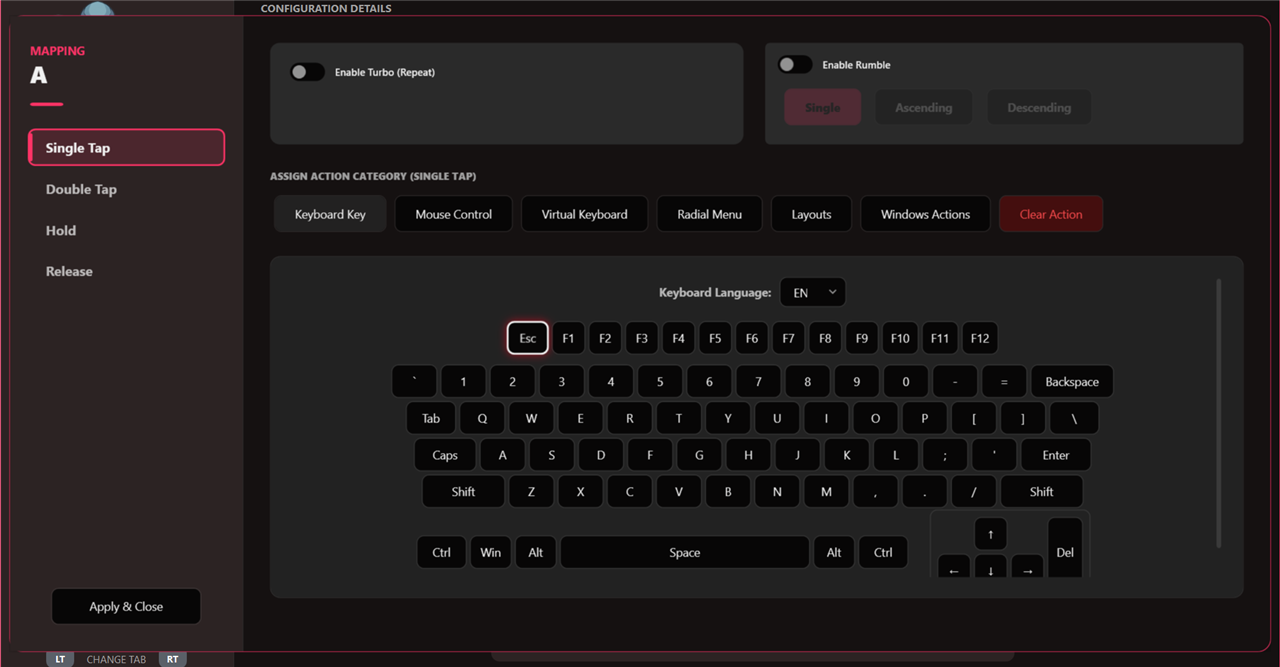 |
| Mouse Control | Clicks, scroll and movement | 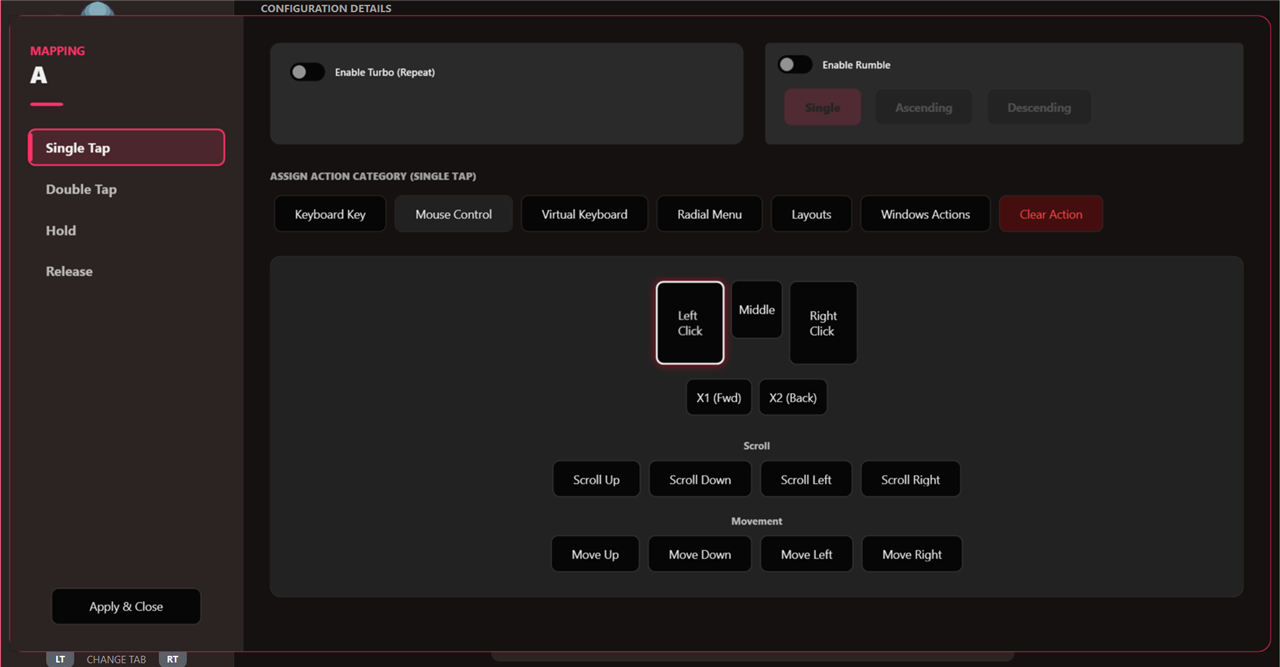 |
| Virtual Keyboard | Open the Realtime or Buffer keyboard, or Close Keyboard | 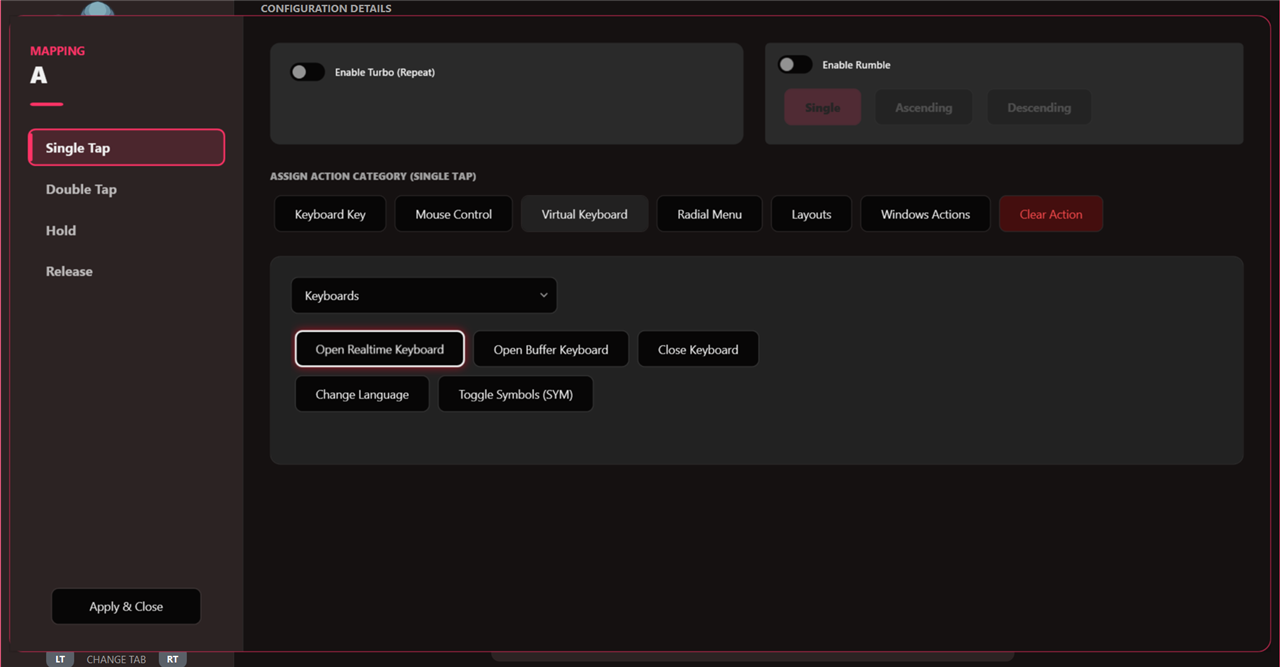 |
| Radial Menu | Open one of your menus | 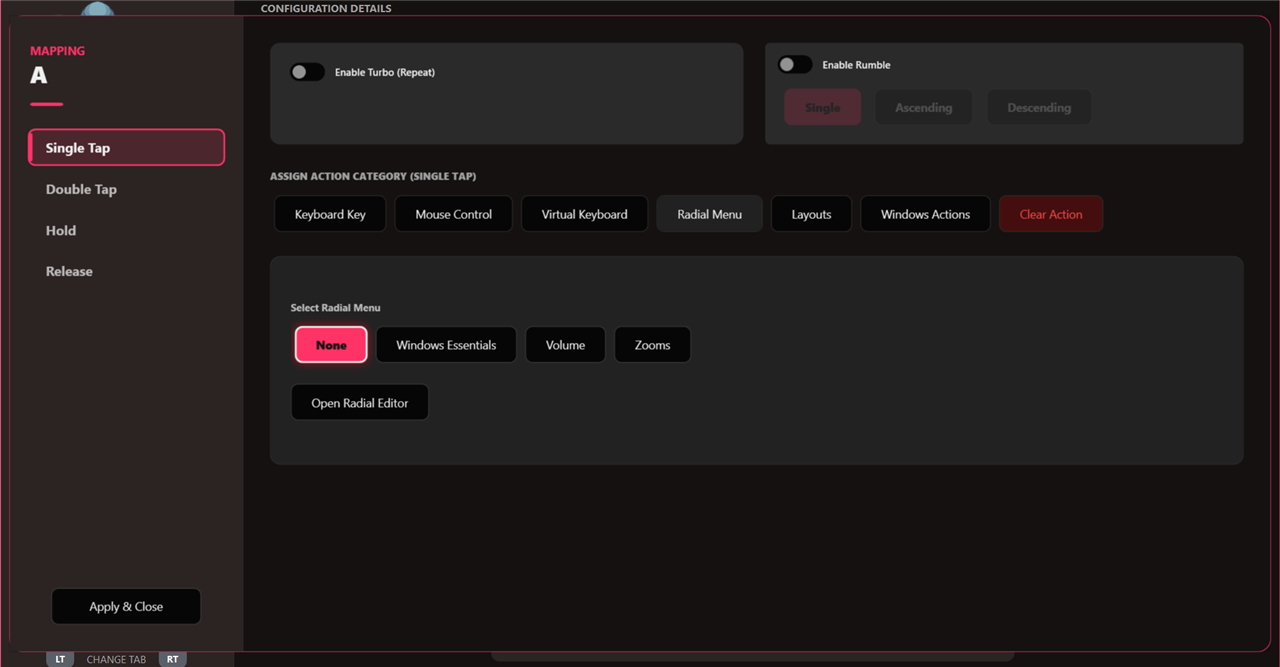 |
| Layouts | Switch to another layout, with Hold / Toggle / One-Way | 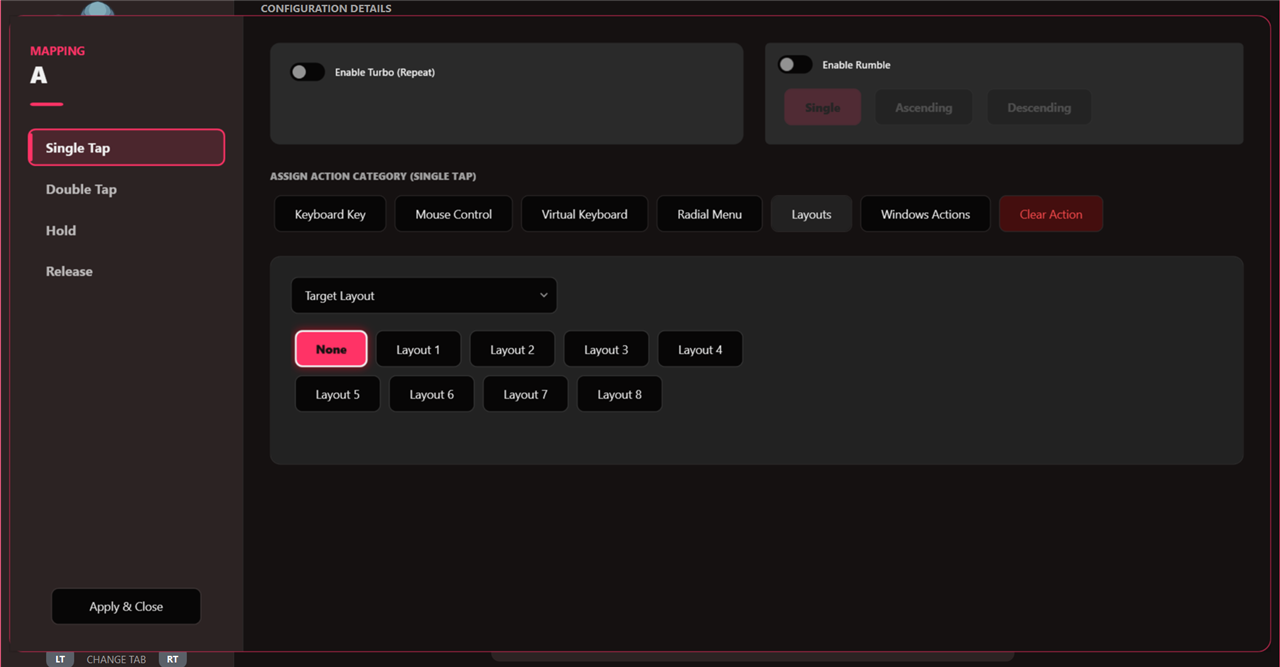 |
| Windows Actions | Close App (Alt+F4), Show Desktop (Win+D), Task Manager, Window Switcher, plus Shell and Media groups | 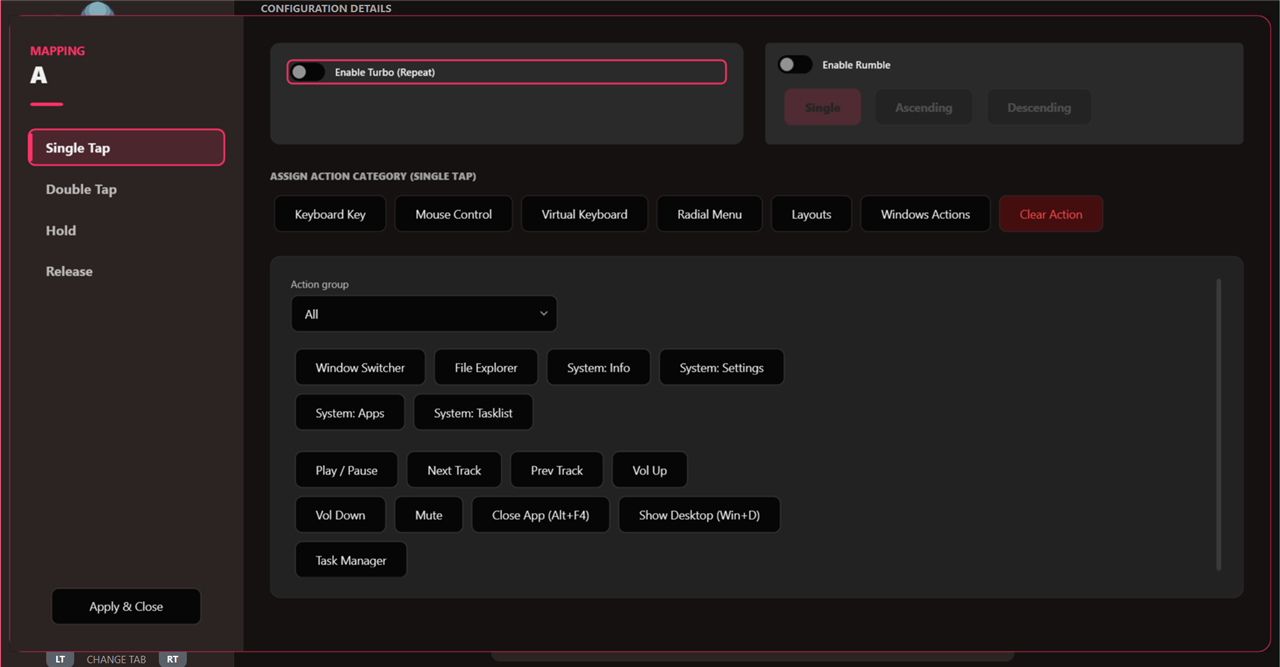 |
One slot can hold more than one thing at once — a keyboard key and a mouse click assigned to the same slot are sent together on the same press.
Slot-specific controls
- Double Tap adds a Double Tap Speed slider — how fast the second press must come.
- Hold adds a Hold Threshold slider — how long the button must be held.
- Release is the plainest slot: it fires when you let go.
Clearing
The Clear button at the bottom names the slot it will clear — Clear Single Tap — so it can only affect the slot you are looking at.
Turbo and rumble
On the editor's Button tab:
- Enable Turbo (Repeat) auto-repeats while held. Repeat Delay sets the rate and Enable Acceleration speeds it up the longer you hold.
- Enable Rumble vibrates when the button fires: Single, Ascending or Descending.
Sticks and the D-Pad
Under the Device Layout picture, three dropdowns set what the sticks and D-Pad do as a whole: Mouse, Scroll or None. The gear button beside each opens its detailed settings (sensitivity, deadzone, acceleration).
⚠️ When a stick or the D-Pad is set to anything other than None, its four directions are taken over by that behaviour and show as locked in Device Layout — you cannot also bind them individually. Set it back to None and the bindings you had are still there. The stick click (L3 / R3) is not a direction and stays bindable either way.
Combos
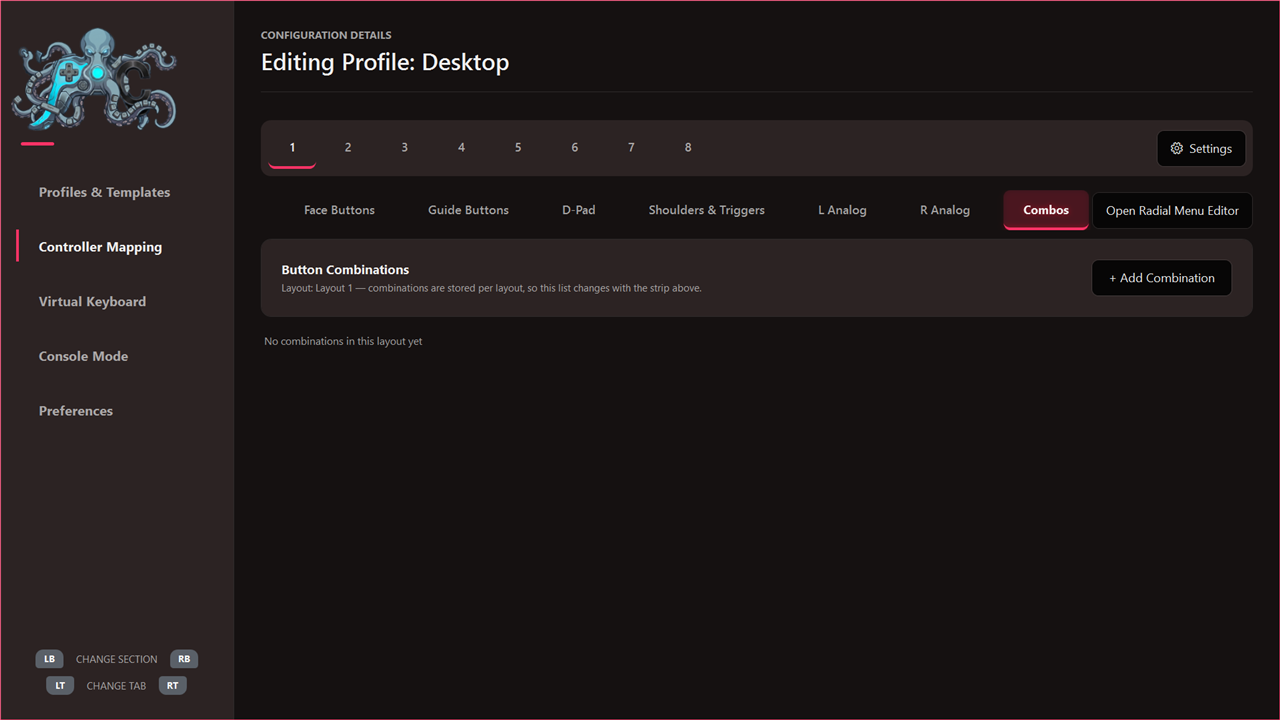
5. Layouts
Each profile has eight layouts, numbered 1–8 on the strip at the top of Controller Mapping. A layout is a complete set of bindings, so one profile can hold eight control schemes.
You switch layouts at run time by binding the Layouts action to a button. It works in three ways:
| Mode | Behaviour |
|---|---|
| Hold | The layout applies only while the button is held |
| Toggle | Press to switch, press again to switch back |
| One-Way | Switch and stay |
The editor always names the layout you are editing in its top-left corner. This matters more than it sounds: a binding placed on layout 3 does nothing while layout 1 is active, and that is the most common reason a new mapping "does not work".
6. Radial menus
A radial menu is a wheel of actions you open with one button and pick from with the stick.
🔑 Menus are shared across profiles. The menu itself belongs to you, not to one program. What belongs to a profile is the binding — which button opens which menu. So a menu you build once is available everywhere, and you can open it from a different button in each game.
Open the editor with Open Radial Menu Editor at the bottom of Controller Mapping.
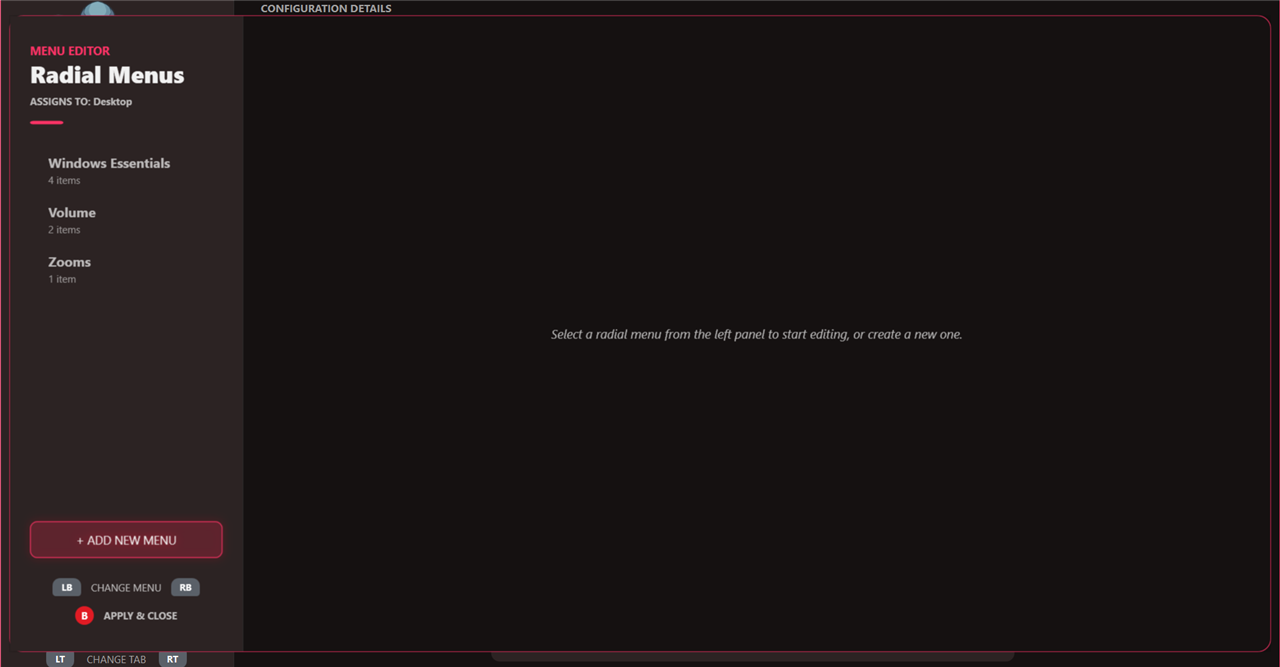 (nothing selected) ·
radial/menu-selected__fullscreen.png (a menu open)Building one
- Press + Add Menu. It appears in the list on the left with its item count under the name.
- Set Menu Name at the top.
- Press + Add Button for each entry. Every entry has:
- Button Name — what it is called
- Colour and Symbol — how it looks on the wheel
- Show as — symbol only, or symbol and text
- Assign Action — what it does when picked
- ✕ — remove the entry
- Use the ▲ / ▼ arrows on a row to change the order entries appear on the wheel.
- Press B (Apply & Close).
Menu Settings ▼ expands in place for the menu's own options. 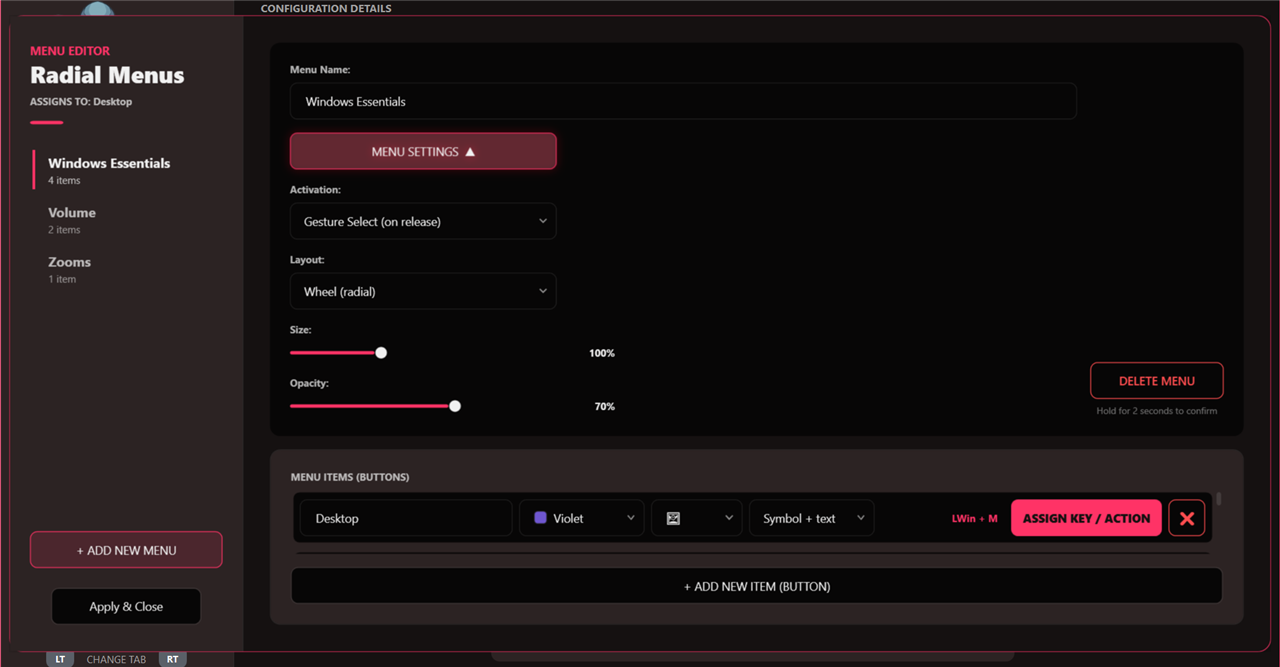
⚠️ Delete Menu removes the whole menu and cannot be undone.
Opening one
Map a button to the Radial Menu category (section 4) and pick the menu. A menu entry can itself open another menu, so menus can nest.
LB / RB move between menus while the editor is open.7. The Virtual Keyboard
There are exactly two Virtual Keyboards, and the difference is where your typing goes:
| Realtime Keyboard | Buffer Keyboard | |
|---|---|---|
| Keys go | straight to whatever is focused, as you press them | into the keyboard's own text box first |
| The program underneath | keeps running | is held still while you type |
| Text arrives | immediately | when you close the keyboard |
| Use it for | desktop apps, browsers, chat | games that would react to the pad while you type |
You open either one by mapping it to a button (section 4, Virtual Keyboard category). The same category has Close Keyboard, so you can bind a dedicated close button.
The prediction row — four buttons
Above the keys sit four buttons: three suggestions and one add-to-dictionary slot.
| Button | What it holds |
|---|---|
| 1st (left) | Second-best suggestion |
| 2nd (middle) | 🔑 The best suggestion |
| 3rd (right) | Third-best suggestion |
| 4th | + "word" — adds what you typed to your dictionary |
🔑 The best match is the MIDDLE button, not the first. The three suggestion slots fill centre-out — best to the middle, then left, then right — the way phone keyboards do it, because the middle is where your thumb already is.
The 4th button is separate on purpose: adding an unknown word used to consume the third suggestion, so you had to choose between a suggestion and teaching the keyboard. Now you get both. It appears only when what you typed is not already a known word, and it shows the word in quotes so you can see exactly what will be stored.
Suggestions keep your capitalisation. Type
Wed and pick the suggestion and you get Wednesday, not wednesday. Only the part you actually typed is re-cased; the rest stays exactly as the dictionary has it, so words with capitals inside them — iPhone, eBay — survive being completed. Nothing is blanket-uppercased, which is also what keeps alphabets with dotted and dotless letters correct.Where the files live
| Button | Folder | Holds |
|---|---|---|
| Open Language Folder | Documents\PersonalConsole\Shared\VirtualKeyboardLanguages | One .json per keyboard layout |
| Open Dictionary Folder | Documents\PersonalConsole\Shared\VirtualKeyboardDictionaries | One .json per language's words |
They open in the built-in file browser (section 9). Both are in the Shared folder, so they travel with the rest of your settings rather than being tied to one machine.
Creating a language file
A language file describes what each key prints. It is a plain JSON file:
{ "LanguageCode": "DE", "Base": ["^", "1", "2", "…", "z", "x", "c", "v", "b", "n", "m", ",", ".", "-"], "Shift": ["°", "!", """, "…", "Z", "X", "C", "V", "B", "N", "M", ";", ":", "_"], "Caps": ["^", "1", "2", "…", "Z", "X", "C", "V", "B", "N", "M", ",", ".", "-"], "Sym": ["`", "1", "2", "…", "z", "x", "c", "v", "b", "n", "m", ",", ".", "/"] }The rules:
LanguageCodedecides the code, not the file name. The keyboard shows this value, uppercased. Two files with the sameLanguageCodewill collide.- Each layer is 47 entries, in this fixed order — the standard QWERTY block, left to right, top to bottom:
Row Count Positions 1 13 `1234567890-=2 13 qwertyuiop[]\3 11 asdfghjkl;'4 10 zxcvbnm,./ - Only
Baseis required.Shift,CapsandSymare optional. - Layers are what the modifier keys show:
Shiftwhile Shift is held,Capswhile Caps Lock is on,Symwhen you press SYM.
Creating or editing a dictionary
A dictionary file holds the words for one language, named with the same code —
EN.json, TR.json:{ "Version": 1, "WordsVersion": 2, "Seeded": false, "Words": ["the", "be", "to", "of", "and"], "UserWords": ["gamepad", "roguelike"], "Pairs": { "hello": { "everyone": 3 }, "project": { "diablo": 2 } } }| Field | What it is |
|---|---|
Words | The shipped word list for that language |
UserWords | Words you added with the 4th prediction button |
Pairs | Next-word memory: previous → { next: count }. The count is how often you did it. |
8. Console Desktop
Console Mode replaces the Windows desktop with a full-screen one built for a controller. 📸 No catalog frame yet. The desktop only comes forward when no ordinary application window owns the screen, which is deliberate.
Turning it on
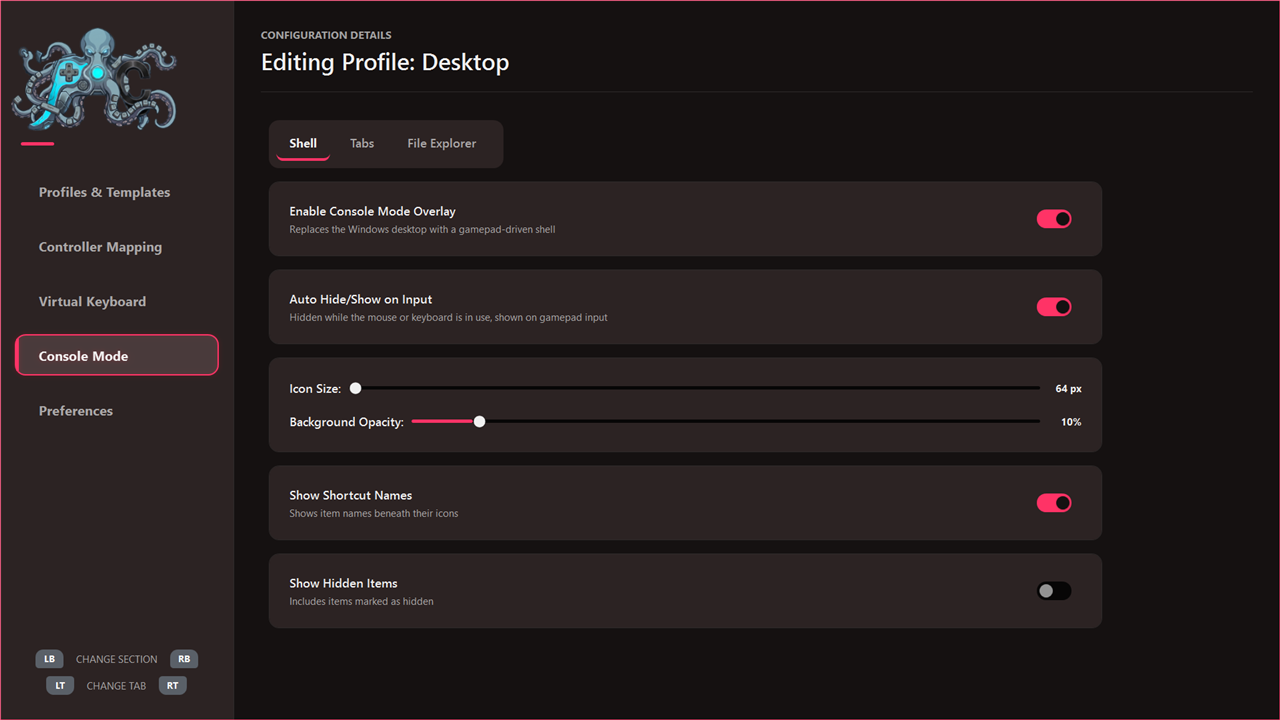
| Setting | What it does |
|---|---|
| Enable Console Mode Overlay | Replaces the Windows desktop with the gamepad-driven one |
| Auto Hide/Show on Input | Hides it the moment you use the mouse or keyboard, brings it back on gamepad input |
🔑 Auto Hide/Show is what lets you share the PC with a normal desktop session — touch the mouse and the console desktop steps aside; pick the pad back up and it returns.
🔑 It never steals focus from a window you are using.
9. File Explorer
A controller-driven file browser. It opens when you open a folder from inside the app.
| Button | Action |
|---|---|
| A | Open the selected item |
| B | Back — hold to exit the window |
| X | Actions menu |
10. Appearance and themes
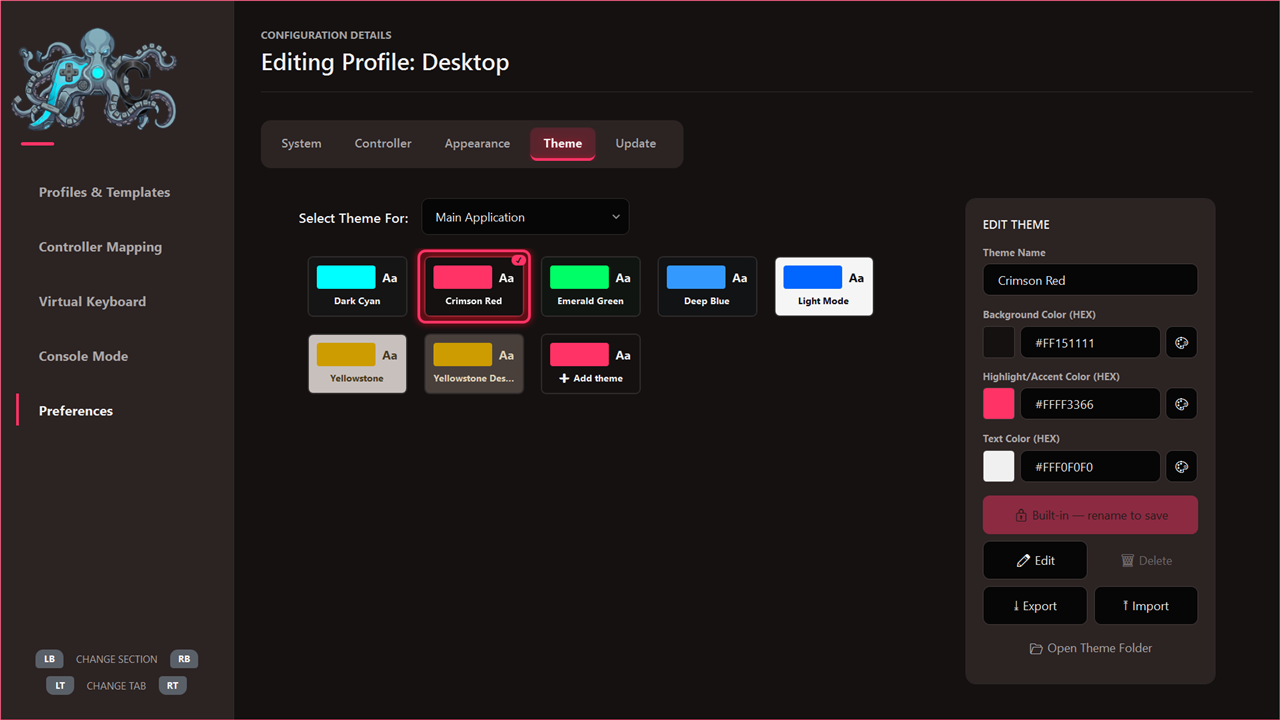
main/prefs-theme__scope-strip.pngPreferences → Theme is where the look is chosen.
Scopes
The strip at the top has three scopes — Main Application, Virtual Keyboard and Console Desktop — and under each it prints the theme that scope currently uses. They are independent.
11. Controller reference
Every control in this app can be reached with the controller, the mouse and the keyboard.
| Button | In the app's windows | In a radial menu | In File Explorer |
|---|---|---|---|
| A | Select / activate | Pick the highlighted entry | Open |
| B | Back; closes the innermost thing that is open | Close the menu | Back (hold to exit) |
| X | — | — | Actions menu |
| LB / RB | Change section | — | — |
| LT / RT | Change tab | — | Switch view |
12. If something goes wrong
The taskbar looks dead after the app was force-closed.
Console Mode hides the Windows taskbar while it owns the screen and hands it back when the app exits normally. Killing it from Task Manager skips that hand-back. Start PersonalConsole again and exit it properly, and the taskbar comes back.
Console Mode hides the Windows taskbar while it owns the screen and hands it back when the app exits normally. Killing it from Task Manager skips that hand-back. Start PersonalConsole again and exit it properly, and the taskbar comes back.
A game does not react to the controller.
The active profile follows the foreground window; a program with no profile of its own gets the Desktop profile. Use the Emergency Desktop Mode combination to force your way back, then give the game its own profile.
The active profile follows the foreground window; a program with no profile of its own gets the Desktop profile. Use the Emergency Desktop Mode combination to force your way back, then give the game its own profile.
Menus work but games do not, or the other way round.
See Preferences → Controller. If a game only reads XInput and your pad is in DInput mode, turn on Virtual Controller Output so the game sees a stand-in controller.
See Preferences → Controller. If a game only reads XInput and your pad is in DInput mode, turn on Virtual Controller Output so the game sees a stand-in controller.
I want to report something.
Preferences → System → Open log folder opens the logs. They record what the app did and never contain passwords or usernames.
Preferences → System → Open log folder opens the logs. They record what the app did and never contain passwords or usernames.